


So, you’ve made the choice to create an OnlyFans account, huh? But maybe you’re not exactly sure where to kick things off or how to go about it. No worries, that’s what we’re here for!
We’ll guide you step by step through everything – from creating the account itself, picking out those eye-catching profile and headline photos, to selecting a catchy username, crafting a standout bio, and deciding on your subscription rate. Ready to dive in? We’re here to help your account shine and make it attractive to new followers.
Setting up an OnlyFans account usually takes between 24 – 48 hours. You’ll need a profile picture, a cover photo, and a valid form of ID like a passport, driver’s license, or an ID card.
We’ll help you get set up in just six easy steps:
- Account Creation
- Setting Your Username & Bio
- Setting Your Location, Website, and Amazon Wishlist
- Selecting Your Cover & Profile Pictures
- Banking Details
- Determining Your Subscription Rate
Let’s start from the beginning:
CREATE AN ONLYFANS ACCOUNT IN 6 EASY STEPS
Before we get you started on your OnlyFans journey, the first thing we’ve got to do is set up an account. It’s a pretty straightforward process, but hey, let’s walk through it together.
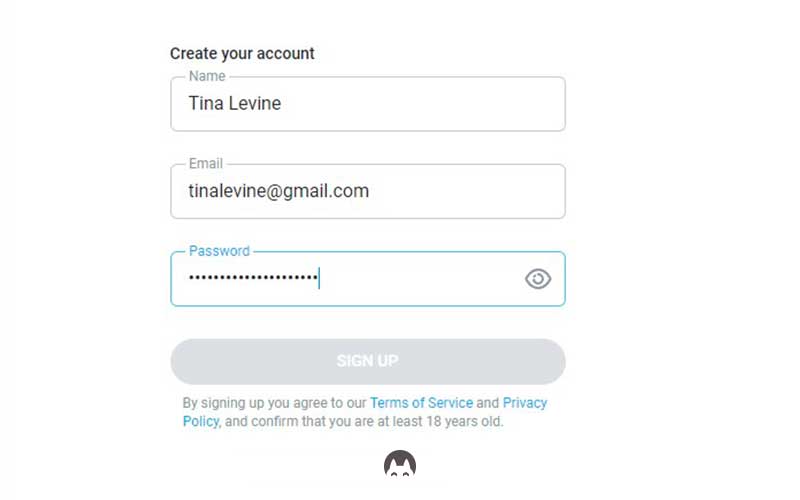
For this guide, we’re going to pretend we’re setting up a profile for a fictitious OnlyFans user – let’s call her Tina Levine. Here’s a little bit about our imaginary Tina:
- 20 y/o
- Is into streaming and gaming
- 168cm / 55kg
- Has a large bum
- bisexual
- cat lover
1. Step: Account Creation
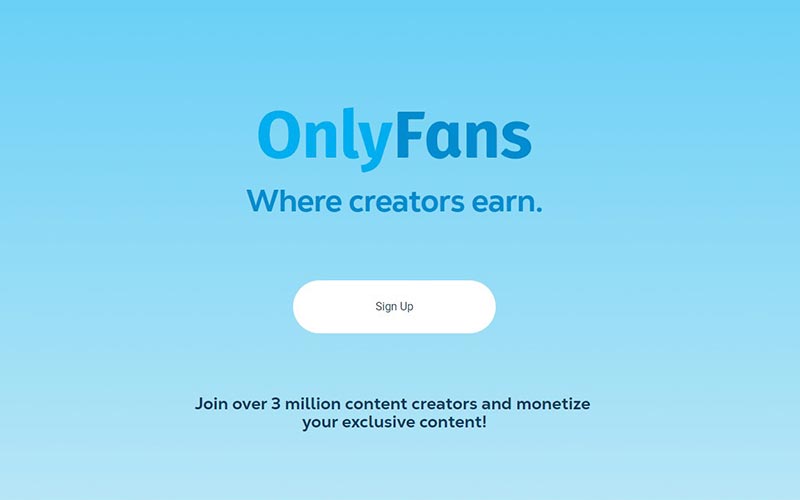
Go the the official OnlyFans website on desktop and click “Sign Up”
Next, you’ll be taken to this screen:
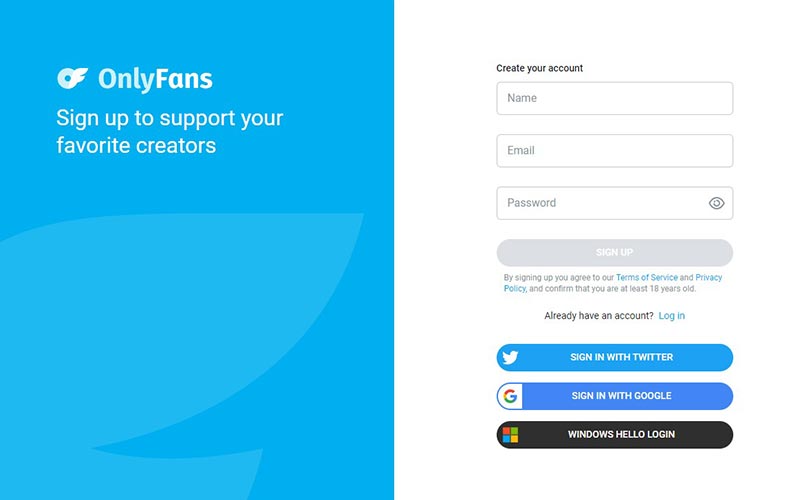
For starters enter your full name and surname while you’re in the process of making an account. After you get verified you can change it to be like your username or any name you like.
Enter a valid email address. This is important as you’ll need to verify your email later. Lastly come up with a fairly strong password that you’ll remember.
2. STEP: CREATE A BULLETPROOF ONLYFANS USERNAME & BIO
Once you confirm your email, you’ll have a successfully registered OnlyFans account! The next thing you’ll want to do is come up with a unique username, BIO and upload your profile and header pictures.
So Tina here want’s to do a gamer niche onlyfans content. Her theme is all about recreating the ideal gamer’s girlfriend and playing games.
She’s also blessed with a cute, big round butt – her special feature. So, she chose the username PeachyGamerTina. This will be her main handle. She also checked if this username is available across all the social networks relevant to her, which it is, so she’s ready to roll.
There are various online tools you can use to check username availability, like namecheckr. If that doesn’t cut it, a simple internet search like “check if Instagram/Twitter/Reddit name is available” will help you find what you need. Alternatively, you can manually try to create an account using your desired username to check if it’s free.
KEY POINTS TO LOOK FOR WHEN CREATING A ONLYFANS USERNAME:
- Branding from the start. While coming up with a username, remember this will be the name that represents your brand. Folks are more likely to remember you by your username rather than your real name. So when you’re brainstorming, it’s a good idea to check if your chosen name is also available on other social networks you plan to use for promoting your OnlyFans, like Instagram, TikTok, Twitter, or Reddit.
- Another tip is to make your username relevant to your niche. Why, you ask? Simple. This gives your potential followers an immediate idea of what your OnlyFans content might be. Plus, it makes it easier for people to find you when they’re searching for accounts related to their interests (we’ll dive deeper into this a bit later).
- Don’t use a username that doesn’t relate to you or your niche. It’s a common error where future creators pick generic or meaningless names like ‘tina3110031’ or ‘mistress-tina’. Both of these examples can be misleading. The first one might make people think your account is a spam bot, and the second one could lead people to believe you’re into BDSM, which might not be true. So it’s crucial to ensure your username aligns with your niche and is genuinely reflective of you.
Note: You can also use your full name or a unique nickname for your OnlyFans account. Just remember to stick to the same principles – keep the same username across all your networks. That’s the key to making you brand look premium. You can even add an emoji to your name to keep it interesting.
After you’ve set your username, there’s really no going back – this becomes your brand and stage name, the name by which your audience will remember you. So, try to avoid changing it once it’s set up.
Think about it, if Rihanna suddenly decided to go by her real first name, Robyn, it would cause a lot of confusion, right? Not to mention, all the online links associated with her stage name would be rendered useless because that name is her established identity. So choose your OnlyFans username carefully, because it’s going to stick with you.
Creating a killer BIO for OF:
With your username decided, let’s move on to your bio, probably the most crucial part of your OnlyFans profile beside your profile and cover images. It’s the first thing visitors see when they check you out. Be sure to include all the fun stuff you’ll be doing on your OnlyFans and why your account stands out from the crowd (you can exaggerate a little bit, it’s marketing after all)
Also, don’t forget to add something personal about yourself – share a bit about your likes, interests, passions, and if you have a broader mission. We’re all humans, not a restaurant menu and adding a human element to the story creates connection.
Try your best to list the services you will be offering like: streaming, custom requests, posting daily, highlight anything specific to your niche (e.g., if your niche is ‘anal’, you could specify ‘using large toys’, or if you’re a ‘kinky girl’, you might mention ‘with a fetish for older men’). People will decide whether to subscribe based on this information, so try your best to convince them to take the plunge.
Try to avoid something boring and generic like:
Hi, my name is Tina, love you came here. Let’s have fun.
This might work for someone like Rihanna, but unless you’re her, please don’t write something like this.
Go for something that will grab the users attention and intrigue them to read the whole thing, like:
Intro:
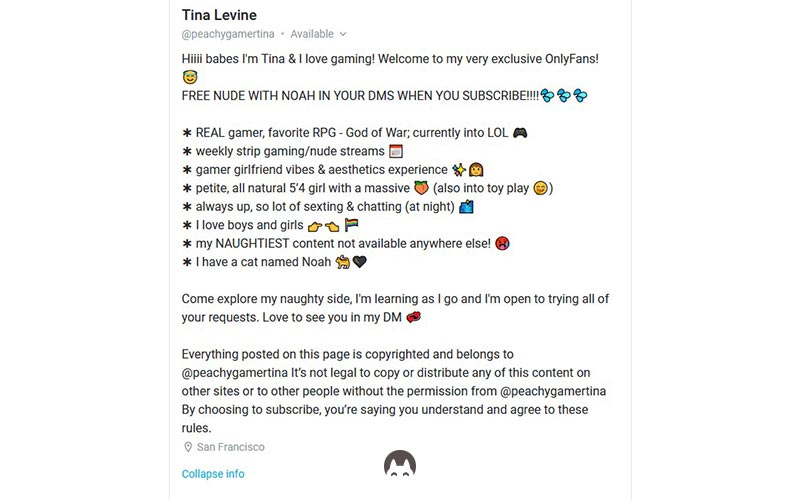
Hiiii babes (or you can insert a name for your fans, if you wanna go to that direction) I’m Tina & I love gaming! Welcome to my very exclusive OnlyFans 😇💞
The intro section of your bio holds significant weight because that’s the first thing mobile users see before tapping the ‘see more’ button. Aim to craft it in such a way that it tempts the viewer to continue reading.
Something you’ll give them for free – a freebie:
FREE NUDE WITH NOAH IN YOUR DMS WHEN YOU SUBSCRIBE!!!!💦💦💦
Things you can do in a bullet-point format:
✱ REAL gamer, favorite RPG – God of War; currently into LOL 🎮
✱ weekly strip gaming/nude streams 📅
✱ gamer girlfriend vibes & aesthetics experience ✨👩
✱ petite, all natural 5’4 girl with a massive ass🍑 (also into toy play 🤭)
✱ always up, so lot of sexting & chatting (at night) 🌃
✱ I love boys and girls 👉👈 🏳️🌈
✱ my NAUGHTIEST content not available anywhere else! 🥵
✱ I have a cat named Noah 🐈🖤
Note: You can use websites like aestheticssymbols to create eye-catching lists with different bullet styles.
Call to action (CTA) outro:
Come/Cum explore my naughty side, I’m learning as I go and I’m open to trying all of your requests. Id love to see you in my DM 💋
Another good idea is to include a disclaimer in your bio. This helps maintain the exclusivity of your content:
Everything posted on this page is copyrighted and belongs to @………. It’s not legal to copy or distribute any of this content on other sites or to other people without the permission from @………. By choosing to subscribe, you’re saying you understand and agree to these rules.
By now we have something looking like this:
You’ll probably change up your bio as time goes by, and that’s totally okay – it’s not like changing your username. As the marketing gurus say, “Always be testing”.
When crafting your bio, try to include in SEO content. This means including specific keywords into your text so people or search engines can locate them and display your content to those who are searching for it.
Third-Party Search Engines for OnlyFans:
OnlyFans’ search function may not be particularly helpful because the platform aims to maintain exclusivity and intimacy. Unless you know the exact username you’re searching for on OnlyFans, you probably won’t stumble upon much else.
OnlyFans is committed to keeping its users private and anonymous, unlike the third-party search engines. These engines emerged as a solution to onlyfans limited search bar, helping people find creators based on their preferences or locations.
Some of the most popular ones include FansMetrics, OnlyFinder, OnlySearch, and TopCreators. These platforms allow people to search for creators by entering a specific keyword or username.
For instance, someone might want to find all the creators who are into ‘GAMING’ or they may want to find people from a specific location.
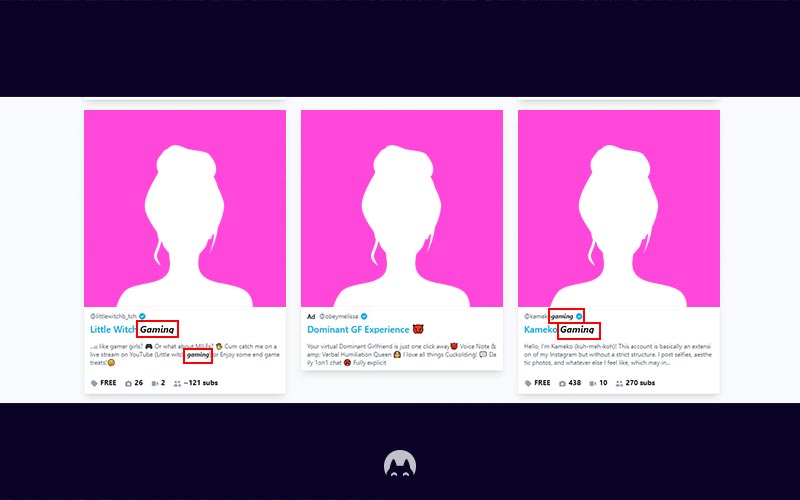
That why it’s important to include keywords specific to the people you wanna attract.
That’s why our imaginary Tina included the keyword ‘gamer’ in both her username and bio, along with other relevant keywords like ‘gamer girlfriend’, ‘streams’, and ‘massive ass’.
You can include keywords relevant to you or your niche in both your BIO or username. For example, this page provides a detailed explanation of OnlyFans niches and can give you an overview for what to look for, as well as spark some fresh ideas.
3. STEP: Setting Your Location, Website, and Amazon Wishlist
Location:
Now, it’s time to set your location. Choose the city you live in, but if you’re living in a small town, choose a more well-known city nearby because it makes it more relatable.
Some creators use this feature to add fun and catchy locations like ‘in your room’, ‘on your face’, or ‘in your heart’. Feel free to use whatever feels most authentic to you. But remember, if you don’t include your location here or in your bio, you won’t show up when people search for creators based on location. This might be just what you want if location-based discovery isn’t part of your strategy.
Website:
People often share their LinkTree links or something like that here. But if you have something special that you wanna share with your fans, this is the perfect place to do it.
Amazon wishlist:
You also have the option to link your Amazon Wishlist if you have one. If you have access to an Amazon store, you can create a Wishlist with items you’d like to have but currently can’t afford. It’s a good idea to structure the Wishlist with a 60/40 split, where 60% of the items are related to your OnlyFans business (like outfits, lingerie, toys, etc.), and the remaining 40% consists of things you genuinely need in your daily life.
This way, you can keep both yourself and your fans happy. Amazon wishlists can be a way to generate income on OnlyFans as well, but more on that in a different blog.
Now when that’s all filled in, go ahead and click the “SAVE” button, and let’s proceed to setting up your profile and cover photos.
4. STEP: COVER & PROFILE PICTURES
Your profile picture and cover photo are super important, so don’t skimp on these.
Let’s start with the profile pic. Although Onlyfans don’t specify the dimensions, going for a 1:1 ratio like 1500×1500 should work just fine. Make sure your profile pic is high quality and shows a close-up of yourself. Use bright, well-lit photos – stay away from blurry or too-dark pics, please.
You can choose to feature your face or a favorite body part, but we’d recommend going with the face – it’s what people usually connect with. Snap your best-looking photo and feel free to use apps to give it that extra pop, but remember not to go overboard. We don’t want people feeling let down when they find out it’s not the real you. Having a great photo is crucial since it’s the first thing people see when they visit your OnlyFans account.
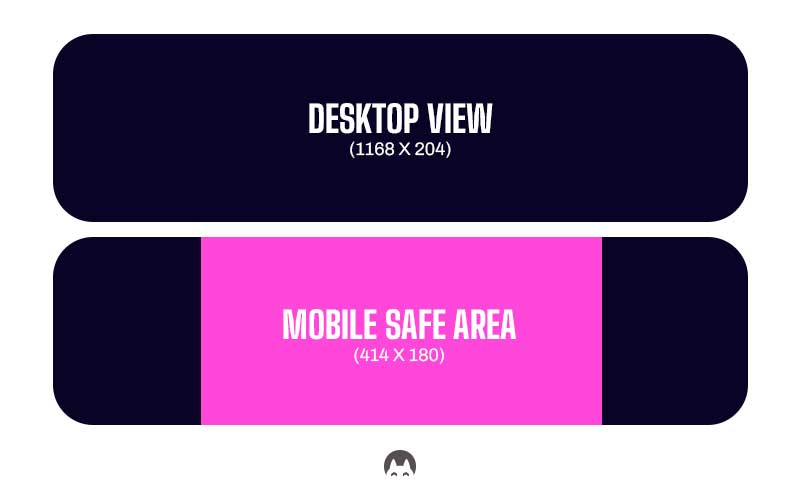
Next up, cover photo (banner). Here’s your chance to let your imagination run wild. Cover photos have dimensions of 1168 x 204 pixels, also known as a 5.73 aspect ratio. Since most people browse the internet on their smartphones, be mindful of the mobile save zones.
Avoid placing important elements at the edges of your photo. Always go for a horizontal set up, it might be best to snap a specific photo just for your banner.
As for what to put in your banner photo, there are a few good practices. You could post something unique about yourself, like a picture of your key body part or a collage featuring three or more photos that represent the things you love and offer to your fans. Alternatively, you might want to feature your favorite activity, or even a spicy chat screenshot with a fan or someone special.
Just like with the profile pic, make sure your cover photo attracts because it’s the second photo potential fans will see. So, let’s make them captivating and eye-catching!
Whatever you do don’t post EXPLICIT photos on both your banner and profile picture, it’s not allowed by onlyfans BUT do keep them tempting, sexy and thirst trappy.
Tina opted for a profile picture in her gaming chair, rocking her headset and giving the camera a sexy upshot catching attention right away. For the banner, she decided to go for a shot of her lying down on her stomach, playing video games on her bed with her booty visible from a side profile.
Congrats! We’ve created an almost finished up onlyfans account that looks aesthetically pleasing and ready to convey mere lookouts into fans. Last thing left is setting up your subscriptions and banking info.
Let’s dive right into it and get everything sorted!
5. STEP: BANKING DETAILS
For this step you need to use your mobile device. From your home screen click ‘More’ and click ‘Become a creator’. This will lead you to the following screen
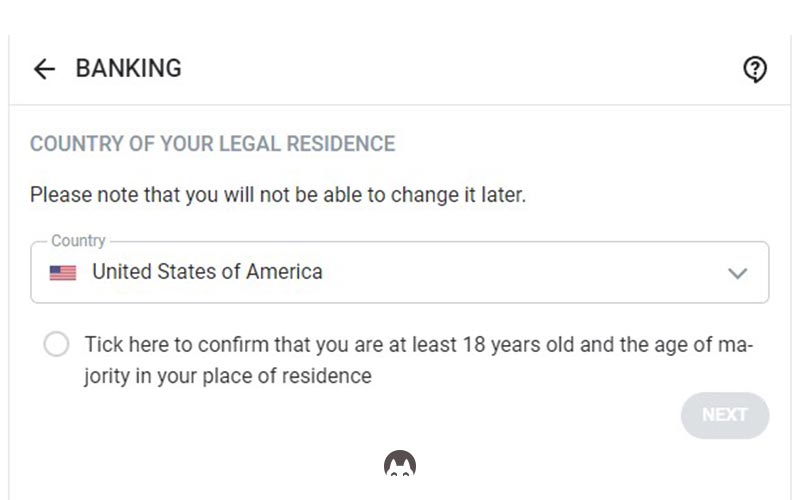
Now, pick your country of legal residence or one where you’ve got the necessary documents from. Remember, to become a creator on OnlyFans, you need to be 18 years or older.
Keep in mind that not every country is listed, so double-check if your country is on the available options.
Once you’ve selected your country, click ‘next,’ and you’ll be taken to the next screen. Click ‘next’ again, and you’ll be directed to a document titled ‘IMPORTANT INFORMATION – PLEASE READ.’ Basically they are telling you here that you are consent for using face match identification as well as you let onlyfans verify your information given to them (age, name, etc). Take your time to read through the entire document, and when you’re ready, click ‘I agree.’
You’ll then be asked to upload a photo of your ID, drivers license or Passport. After you upload the those, you’ll be asked to upload a life selfie, go ahead and do that.
Now let Onlyfans process the given information.
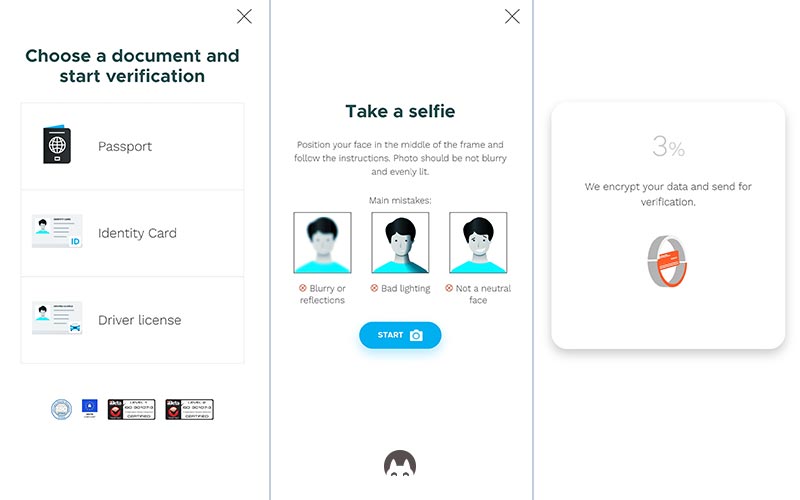
Once you’re done with that, you’ll be taken to the banking screen. Just fill in all the information they ask for. This is the final step in the verification process. After you complete it, OnlyFans will need about 24-48 hours to review your application. If you get approved, you’re all set! You can then proceed to connect your bank account and set up your subscription fees.
Once you’re approved on OnlyFans, you’ll need to link your bank account to the platform and select your payout options. This way, OnlyFans knows where to send your hard-earned money. Different countries offer different payout options, so depending on your location, you’ll have a choice between some of these:
- Bank transfer ACH
- Direct transfer OCT
- International bank transfer SWIFT
- Visa Direct
- E-wallet
- International transfer SEPA
- Cosmo Payments
- Paxum
- or even some options that are exclusive just for your country
Pick the one that suits you best and makes you feel comfortable.
It’s important to note that OnlyFans takes a 20% cut from your earnings. So, let’s say you make $100. OnlyFans will deduct $20 as their share (GROSS), leaving you with $80 (NET). So keep that in mind.
For any additional information you may need, you can visit OnlyFans’ detailed FAQ section for more guidance.
Note: If you happen to live in a country like Russia, Bosnia, Belarus, or others where becoming a creator on OnlyFans might not be an option, don’t worry. If you have residency in another country where you can register as a creator, you can use those documents to sign up on OnlyFans.
At last, we arrive at our last step which is,
6. STEP: SETTING UP YOUR SUBSRIPTION RATE
Alright, you’ve done the groundwork – you’ve got your account up and running, picked out the perfect cover and profile picture, given yourself a name, crafted a top-notch bio, and sorted out your banking details. What’s next? Setting up your subscription! Here’s how you do it.
From your ‘Home’ screen, hit ‘More’, then ‘Settings’, then ‘Subscription price and bundles’.
Next, you get to pick your own adventure: a paid account or a free one? They’re different, so let’s explain.
Paid Account
If you choose a paid account, your posts will be locked up tight for everyone except your subscribers. Anyone who’s interested in checking out your content will need to subscribe to get a look at what you’re offering. You have the freedom to set your price as per what you’re comfortable with – the bottom limit is 4.99 USD, and the top is 49.99 USD.
If someone purchases your subscription, they get an all-access pass to your content. You won’t have the ability to lock posts, and subscribers will be able to join your live streams at no extra cost.
A common mistake to avoid for beginners: Don’t set your subscription price too low. Make sure you’re satisfied with the price you set. Starting off too cheap can lead to problems later when you want to raise your subscription price. That’s because all your current subscribers have to agree to the new price before their next billing cycle.
Free Account
On the other hand, if you go for a free account, anyone with an OnlyFans account can subscribe to you for free and view your posts immediately. The major difference here is that you can put price tags on individual photos. Your subscribers can then pay to unlock them.
You can even lock some content completely, or blur out the naughty parts, and set a price for people to access the clear version.
Ultimately, the choice is yours whether you want to charge a fee every 30 days or offer free access and make money as you go along.
HOW MUCH SHOULD I PRICE AS A BEGINER ON ONLYFANS?
As a newbie, we recommend not pricing your subscription above $10 since you’re still building your fan base. Your social proof (number of fans, likes and posts under your name on your cover photo) is not high enough, so people might hesitate to spend too much money on your content right out of the gate.
Once you’ve started building up your fan base, that’s when the fun really begins. You can begin selling your exclusive, spicy content through direct messages and start making some money!
Alternatively, you could offer a free account. This approach helps you build trust by showing you’re not a bot promoting other accounts, but a real person who posts regularly. Plus, it gives potential fans a sneak peek at what you have to offer.
Once you’ve got their interest, you can lock up and put a price tag for your most spiciest posts and any other content you choose. This is known as PPV, or Pay Per View content.
A third option is to experiment with both strategies by running two separate accounts, one free and one paid. This way, you can see which strategy works best for you in terms of engagement and conversions.
OnlyFans provides cool options like Promotions and Bundles for your fans.
Promotions are a fantastic way to encourage both new and current subscribers to stick around for another month. After all, the ultimate goal here is to keep people engaged so they want to stay on board for the next month.
You also have the option to create bundle deals for 3, 6, and 12 months, offering your content at a discounted rate. It’s an especially appealing option for your current fans who are already familiar with you and your work because a bundle deal could be the little nudge they need to resubscribe.
Well, there we have it! We’ve reached the end of this adventure. All that’s left for you to do now is to create some awesome content and promote your OnlyFans page. Want to know how to do that? Click here
If you prefer getting professional help, you can hire an agency to guide you to success! Check out this link
And if you’re curious about how much you could potentially earn on OnlyFans, take this interactive quiz
Creating your OnlyFans account is as easy as one, two, six! Remember, everyone’s journey is unique, so don’t be afraid to experiment and find what works best for you. Thanks for reading, and we can’t wait to see where your new venture takes you!